Simple uses for a sashigane
Some of the most common applications. Part 6 in a series.
This is part six in a series of posts:
- Sashigane 1: Introduction
- Sashigane 2: Traditional Units
- Sashigane 3: Physical design
- Sashigane 4: Hyoume and Urame
- Sashigane 5: Kou, ko, gen
- Sashigane 6: Simple usage (this post)
- Sashigane 7: Right triangle magic
Common uses
There are countless uses for a sashigane, but this post lists a few of the more common ones.
NOTE: All of these techniques are demonstrated in the video at the bottom of the first post in this series.
1. Timbers from logs
One of the simplest uses is to determine the largest square sided timber you can extract from a round log.
Simply use the urame graduations to measure the diameter of the log. That measurement is the hyoume measurement of each side (the real, normal measurement in sun):

2. Octagons from square Timbers
Another common usage is going the other way: turning a square timber into a somewhat round octagon shape. It’s easy to draw a perfect octagon on the end of the log.
First measure the width of one side (using the top graduations
or hyoume). Call this measurement A.
Now turn over the sashigane, and make a mark A/2 in from each side using the bottom
graduations (urame):
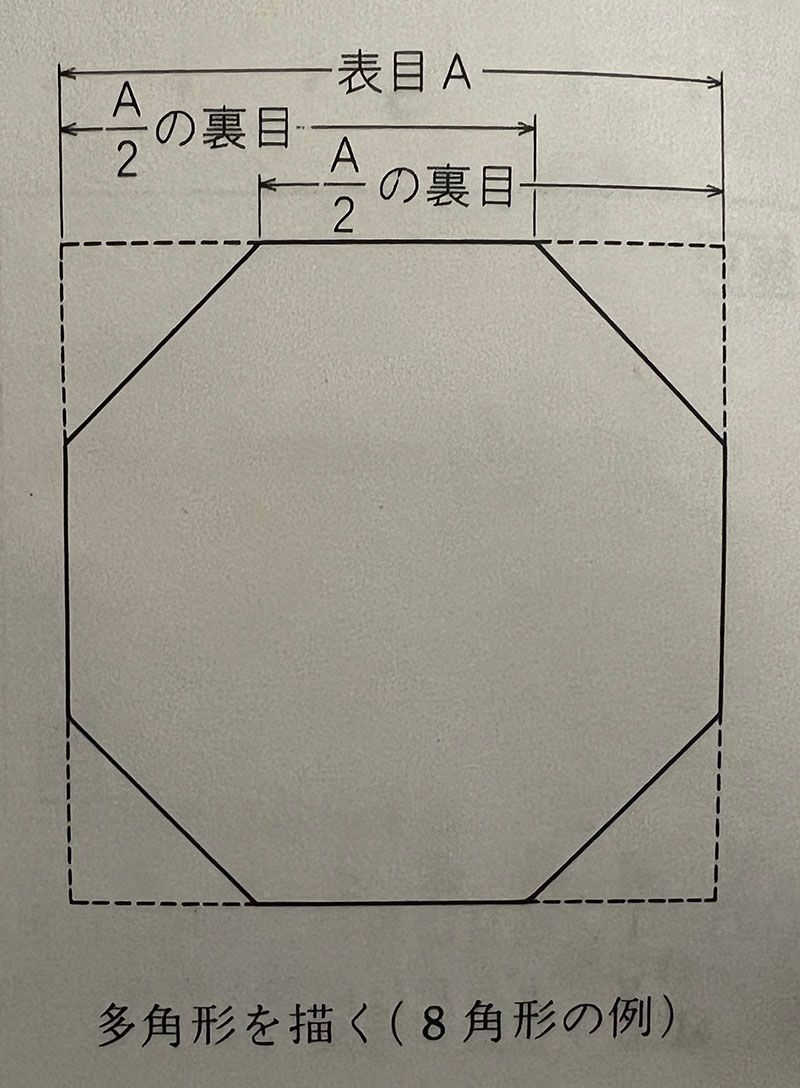
(Why this works isn’t immediately obvious! This article on geometrical construction might help you to visualize what’s going on. In a nutshell, the distance from any corner of the original square to the center is the same distance as from that same corner to the far corner of the octagon.)
3. Measuring circumferences
The inside edge of the tsumate on the underside is often marked with marume (丸目 ) graduations. Each graduation is 1/π × the length of the hyoume graduations:
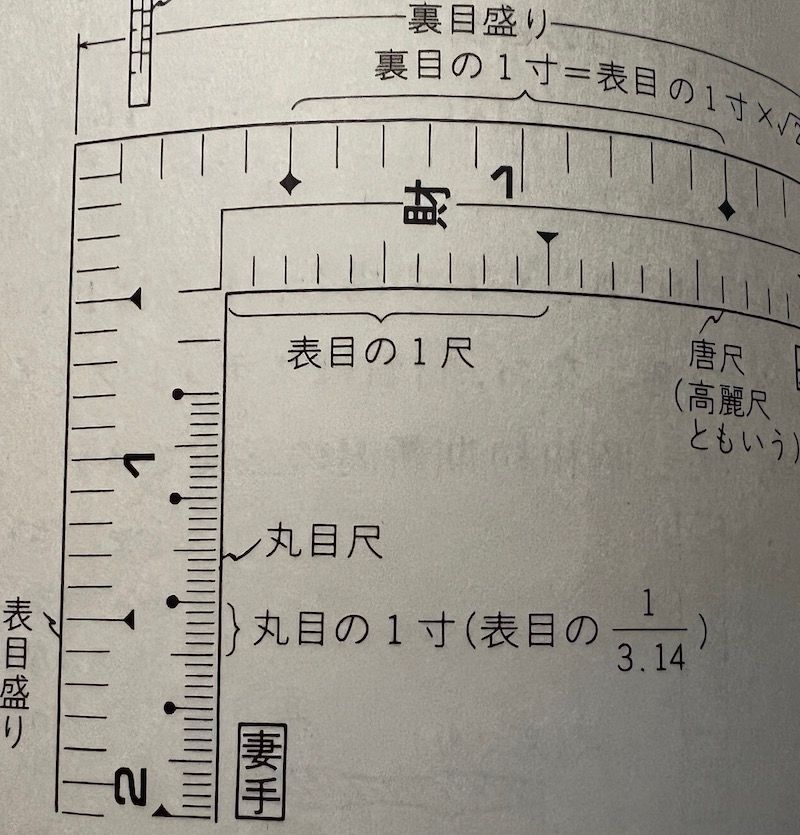
Since the circumference of a circle is just π times the diameter, measuring the diameter using marume graduations gives you the circumference directly (it’s much easier to measure the diameter of a circle with a ruler than it is to measure the circumference!).
4. Measuring depth
One end of the sashigane usually has a few sun marked off beginning at the end of the arm instead of from the corner. One can use this to measure the depth of mortices (ホゾ穴 ) and other features.
4. Sill-plate or threshold layout
Another illustrative use for the sashigane is to layout a sill-plate to fit precisely between two oddly shaped columns or pillars. The diagram below illustrates the process for a made up example.
The diagram illustrates a plan perspective (a top view, looking at the ends of the columns from above). It shows the raw stock for the sill butted agains the vertical pillars at the top. At the bottom is the completed sill-plate after cutting. The middle section shows the markup stock before cutting.
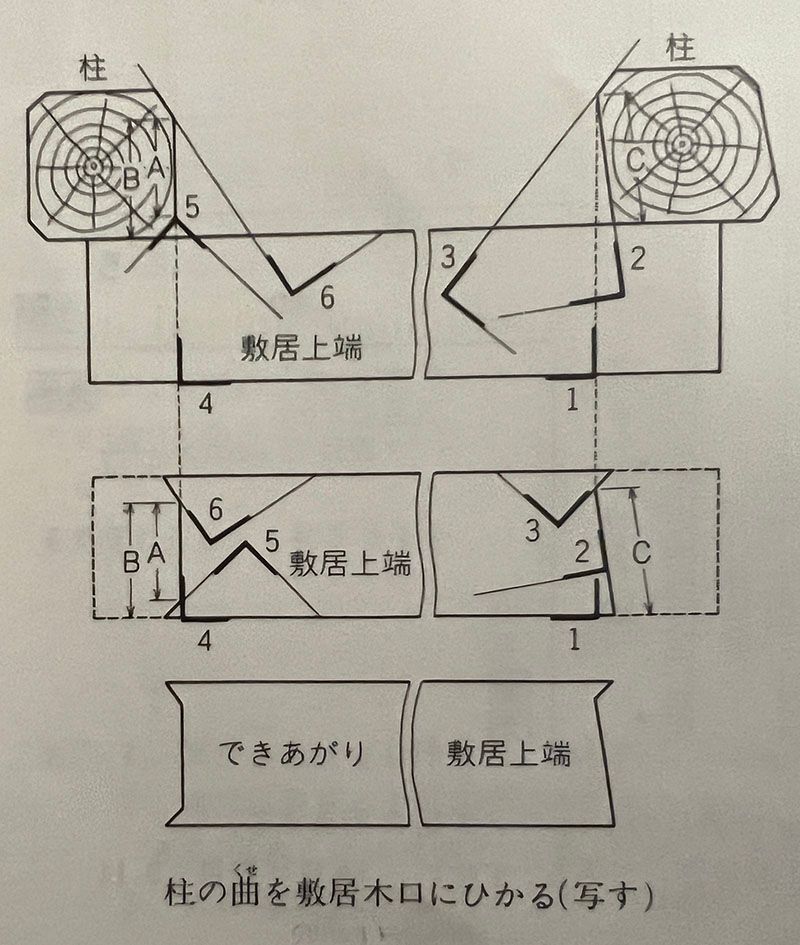
First, butt the raw stock for the sill against the two columns. This is shown at the top of the diagram.
Determine the most interior point on the right edge. This is marked 1 on the right side of the top diagram. For illustration, the sashigane is shown in miniature form. In practice, the long arm of the sashigane should be long enough for one arm to butt against the point on the right column. Strike a line all the way across the stock.
Place the sashigane against the angled face, and strike two lines, one along each arm of the sashigane.
Plase the sashigane agains the remaining angle on the right pillar, and strike two more orthogonal lines.
Now, repeat the process for the left pillar. First identify and mark the most interior point. In this case, the face is already orthogonal to the sill stock so only one line needs to be struck.
Place the sashigane against the lower angle of the left pillar, and strike two orthogonal lines on the raw stock.
Similarly, transfer the remaining angle to the raw stock.
These six steps are shown in the top part of the diagram. Notice that there are two orthogonal lines created for every angle that was transferred. For measurements 1 and 4, we used the side of the stock as one of the lines since those measurements were square to the stock. We drew them explicitly for the non-orthogonal angles.
Note that we can strike lines parallel to any of these marks simply by sliding the sashigane along the orthogonal line.
We use this to layout the cuts as shown in the middle part of the diagram:
First slide the sashigane along the line marked 2 in the top diagram until the other arm intersects line 1. The point where they intersect marks the most interior point. Strike a line from that point all the way to the bottom of the stock.
Next, slide the sashigane along the baseline marked 3 in the top diagram until the other arm again intersects the most interior point. Strike a line to mark the bit that needs to poke outward.
Repeat for the left side. First, strike a line at 4 to mark the interior face.
Next, slide the sashigane along the baseline of 5 until the other arm intersects line 4 near the bottom of the stock. Strike a line to mark the portion that protrudes.
Finally, slide the sashigane along the baseline of 6 to mark out the protruding point at the top left.
After cutting along the layout lines, you’ll be left with the shape shown at the bottom of the diagram, with the correct shape and length to fit precisely between the two pillars.
The process is much easier to do than it is to describe. It just takes a bit of practice to learn to visualize the shape you are trying to create. Just remember that you create parallel lines by sliding the sashigane along one of the existing orthogonal lines until you reach the desired point for the parallel line.
In tight quarters, it’s often easier to tape a piece of paper down and do your layout on that (later transfering those marks to the raw stock somewhere else).
This is a very handy technique for many different situations, and will be familiar to many different tradesmen (not just carpenters, but tile layers, stone masons, etc.).
Again, this technique is well illustrated in the video at the bottom of the first post in this series.
Ancient vs. modern construction
One might wonder about my passion for these “antiquated” layout techniques. After all, we have calculators, laser levels, and the like at our fingertips today.
Why bother with these antiquated techniques if more modern methods are available?
Cost of materials vs. work
In the old days, raw material was cheap (if you valued the time and effort to obtain it at near zero). Oddly shaped trees and logs were everywhere. They “only” (!!) cost you the time and effort to cut and transport them, but time and effort were considered a reasonable tradeoff.
Work was cheap, and experienced, skilled workers were plentiful.
Finished material, on the other hand was prohibitively expensive. High quality, flat, straight, and stable material was almost impossible to obtain. Finishing your own material also required far more effort than merely cutting and hauling.
Modern 「ツウバイ」 (2×4) construction has somewhat turned this on its head.
Relatively straight, kiln dried, surfaced-four-sides lumber can be acquired and even delivered to a worksite relatively cheaply.
Knowledgeable and experienced carpenters and other tradesmen, on the other hand, are increasingly scarce and expensive.
Because workers are so expensive, modern professionals don’t hesitate to spend huge sums of money on tools and machines that let them work more quickly.
The ancients had to make do with much more modest tooling (but accomplished high-quality work amazingly quickly nonetheless). Battery powered tools, heavy machinery, laser levels, and the like weren’t available for love nor money.
Modern construction practices somewhat depend on the “flat and straight” nature of finished materials. It’s common practice to preserve the “factory edge” of a piece of plywood, for example, to ensure things remain square and true as they are constructed.
Hobbyist budgets, ancient techniques
But “cheap” is a relative term! Finished materials and quality tools are quite reasonably priced in large quantities for professionals, but a hobbyist only needs small quantities and can only afford much more modest tools.
A hobbyist wants to make something out of that stack of firewood that’s free for the taking. They don’t want to spend a relative fortune on finished material.
A hobbyist like myself also considers his time in the shop as “free”. He won’t hesitate undertaking a job that might take hours, days, or even weeks to complete. It’s time spent for the joy of it.
Ancient craftsman depended on their tools and basic mathematical principles to ensure their creations were true and square, even if their materials weren’t.
They knew for certain that a silk cord stretched between two points created a straight line. They also knew that water seeks it’s own level, that a weight hung from a cord describes a true vertical line, and that sides that are 3 units, 4 units, and 5 units long create a right triangle.
The most important layout tools in their arsenal were the three mentioned in the first post of this series: the sashigane, the sumitsubo (inkpot and line), and the mizuito (water line).
For hobbyists like myself, these traditional techniques employing these tools are incredibly valuable. They allow us to create beautiful things without spending a fortune on material, and mostly just require that we invest our time – something we want to do anyway!
That is why I’m so passionate about these techniques.
Upcoming kikujutsu projects
So far, we’ve only just scratched the surface of what a sashigane can do. As mentioned in the beginning, even the astonishingly complex joints and compound angles required to make a temple or castle can be drawn using nothing more than the humble sashigane.
If you can draw it, and you have the skills with saws, planes, and chisels, you can make the joint.
The Japanese art of layout and measurement is called kikujutsu (規矩術 ). I’ll continue to write about the subject as I continue my own studies.
I’ve several projects in mind to document the process in forthcoming sections.
Eventually, I hope to make a small model of the corner of a traditional Japanese roof (like you might see at a temple or on a castle).
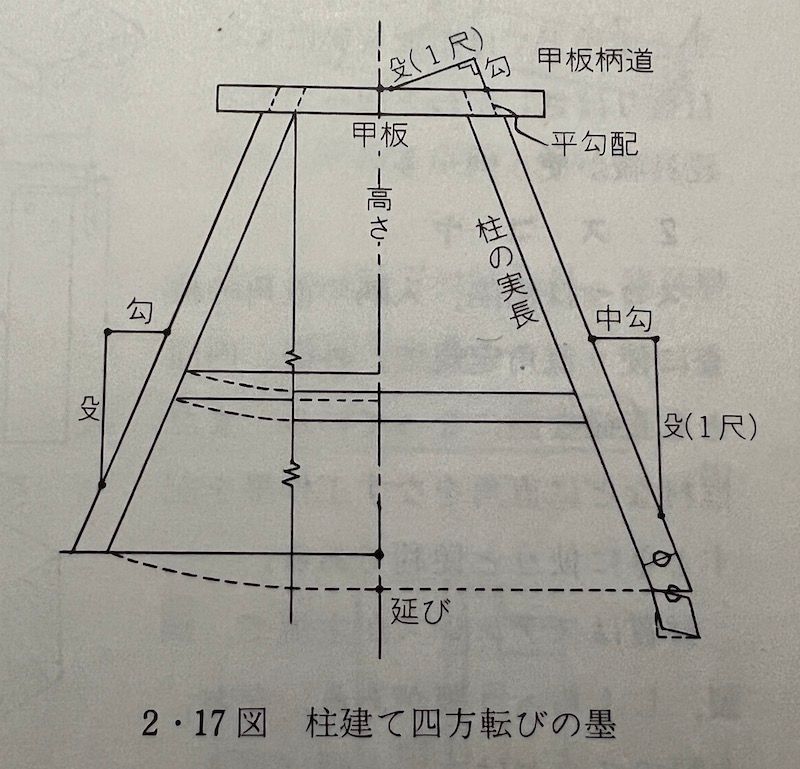
Before that, I will almost certainly construct a relatively simple splay-legged stool:
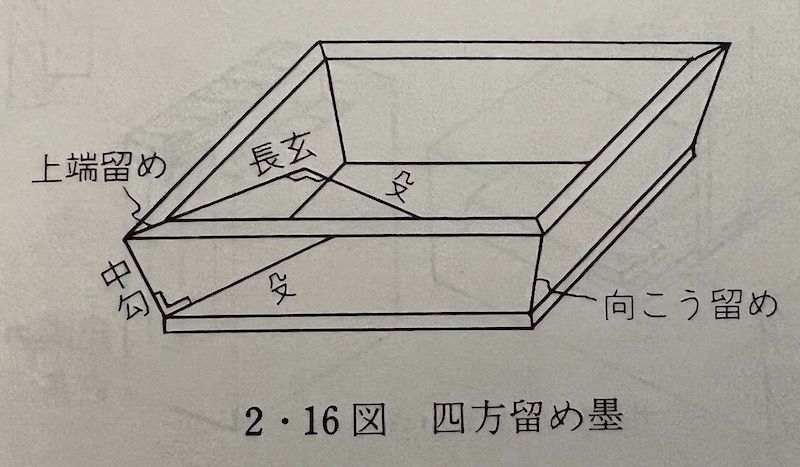
But first, I plan to build something simpler yet: a sort of scoop or tray with four “battered” (or “splayed”) sides:
Believe it or not, all of the compound angles required for any of these projects can be easily drawn using nothing more than a sashigane:
But first we need to cover a few more geometric concepts and terms in the next section before we can get back to practical examples.